Que
Tips

Number One Tip:
Cook by temperature, not by time. It's perfectly fine to time your cook so you have an approximate time everything will be ready or how long your cook might take, but your meat is done when the internal temperature says it's done and not one minute before. Get yourself an instant read thermometer and use it.
The 3 Essentials To Great BBQ
Controlled Time, Controlled Temperature and Controlled Smoke. Everything else is a matter of personal taste.
White Smoke Good - Black Smoke Bad
Clean streams of whitish smoke can layer your food with the intoxicating scents of smoldering wood. But if your fire lacks enough ventilation, or your food is directly over the fire and the juices are burning, blackish smoke can taint your food or lead to unpleasant surprises when you lift the lid.
Start Early
If you are familiar with a particular cut of meat, you may have a good idea of how long it will take to cook, and recipes will often give you a general time table of how long the cook might be. Fact is, when smoking meat, any meat, it is done when it gets done. That's why it is so important to cook by internal temperature and not time. Every piece of meat is different. If you were to take two briskets of exactly the same size, the difference in done times can easily be an hour or more. This difference can be due to the variance in fat content (marbling), moisture content, type of beef, weather, humidity, wrapping time, spritzing time, smoker temperature, recovery time, rest time and the list can go on and on. So start early, relax, listen to the birds sing, pop a top and enjoy the pleasures of cooking outdoors.
Frozen Meat
Never put frozen meat in a smoker. It is a cooker, not a defroster. This can create many problems and could lead to some serious food safety issues.
Completely thaw meat or poultry before smoking. Smoking uses low temperatures to cook food, the meat will take too long to thaw in the smoker, allowing it to linger in the "Danger Zone" (temperatures between 40 and 140 °F) where harmful bacteria can multiply. Defrosted meat also cooks more evenly.
Don't be a Peeking Tom:
Every time you open your pit you loose valuable Heat and Smoke. Depending on the type of smoker and several other factors, it can take considerable time for your smoker to recover back to the desired cooking temperature. This can drastically extend your cooking time, as well as have a serious effect on the quality of the end product. One thing all pitmasters will agree on (possibly the only thing) is that the most important factor in smoking meat is maintaining a consistent temperature through out the entire cooking process. If you need to check your meats temperature or spritz your meat fine, by all means go ahead, but if you're just taking a peek every 30 minutes to see how things look, you are then considered a Peeking Tom and have broken a major pitmaster law.
Injections:
Injections are a great way to infuse flavor and moisture into your meats, especially those that are slow cooked over many hours which can benefit from the added moisture. But are they really necessary? Many of the well known pitmaster never inject their proteins. For example, two time world champion Johnny Trigg, claims "he has never and will never inject a piece of meat." He says he doesn't need to, his meats are juicy without them. Another master in the pit world is Aaron Franklin of Franklin BBQ. They slow smoke dozens of briskets every day, but they never inject their award winning beef. You will find however, that the large majority of competition Pitmasters do inject their products. Some will use upwards of 5 gallons of injection when cooking a whole hog.
Obviously injections are a matter of choice, and depends greatly on each individuals personal preference, type of meat, how it's being prepared and how it's being cooked. For the novice pit junky, injections can certainly reduce the chances of turning out a piece of bland, dried out meat, but before you jump in and start shooting everything up, let's take a look at a couple of the does and don'ts of injections.
As with everything else involved in producing great smoked meat, the key word is "Enhancement". You never want to change the natural flavor of your product, but only to highlight the taste, tenderness and moisture of it.
A good rule when making an injection is to use basically the same ingredients in it that you use in your rub for that same meat. You don't want the outside to taste bold and savory and the inside taste like a cinnamon stick. A simple solution of broth, salt, black pepper and garlic powder is generally a good base for an injection. Small amounts of other spices can then be added to meet your personal taste.
Always use a water soluble base for your injection, such a water, broth, even beer, but never use insoluble fluids like oils. You want something that will penetrate and bind with the meat fibers. We all know that oil and water don't mix, and since meat is made up mostly of water adding oil to your injection is a sure fire way to keep it from being absorb into the meat fibers.
Be very cautious about injecting delicate meats such as poultry. Some injections can drastically change the texture of the tender breast meat found in chicken and turkey. Butter for example. Whenever someone thinks of adding flavor to a nice big turkey breast, they think of butter. The problem is, butter is a fat, and although it may work great on the outside, it doesn't dissolve easily once inside the bird. When injected into poultry, it can tend to clump in an area causing the meat to have a mushy texture. No one wants to get a big bite of mushy turkey breast. You can certainly use butter in your injection but be cautious when injecting. Make sure to inject slowly and move the needle around often and evenly through the meat avoiding pockets of injection. And don't over inject, remember, you just want to enhance, not change the meats flavor.
So go ahead if you like, create your own flavorful, moisture packed injections, just keep in mind some simple rules and don't feed your guest a big helping of injection instead of tasty meat.
Injecting:
When injecting a piece of meat, always inject with the grain. Insert the injector in the same direction that the grain runs. This allows the injection to flow down the grain, similar to traveling down a tunnel. By injecting with the grain, it allows more of the injection to be absorbed over a larger area. Since the injection is able to spread easier, you are also less likely to have a pool of injection in one area.
Another tip is to use as few puncture points as possible. Everywhere there is a hole to the outside of your meat, there is an exit for your injection to leak out. Insert your needle in one spot and then, without pulling the needle completely out, move it around to different areas inside the meat within reach of the needle covering a larger area, then move to another entry spot.
Always inject the meat before applying a rub, otherwise you will wash a lot of your rub off during the injection process.
If possible, always allow at least 3 hours or more (better over night) for your meat to rest after injecting. This allows the injection time to spread and absorb more evenly through the meat.
Rubs:
Rubs can be applied two different ways. By using a premixed combination of spices or by applying each spice one at the time. It is generally accepted that you will achieve a more even distribution of the spices if all the spices are mixed together prior to application. Premixing also allows you to carefully measure each spice, which results in a more consistent mixture. The drawback to this is that mixing your spices before hand is a bit time consuming and if you premix, then you will need to have several different rubs on hand for different types of meat. The rub for pork butt is usually far from the rub you would use on a brisket. Applying the rub premixed might lend to a more even coat, but you have much more flexibility in the application by applying each spice separately. You can adjust each spice according to your taste without having to spend time premixing different rubs and then storing them. Many pitmasters and backyard cooks alike, enjoy making their "Signature Rubs". Some even market their rubs for sale to the public.
I prefer in most cases, to apply my rub one spice at the time since I like to keep my rubs simple, usually only consisting of 4 or 5 spices. Most rubs begin with salt and pepper and then add additional spices to enhance the particular meat being cooked. A common rule of thumb for making a basic rub is using the ratio of 3:2:1:1:. 3 parts Salt being the first ingredient then 2 parts Black Pepper being the second ingredient and then 1 part of any additional spices you choose to add.
Of course this can and should be adjusted to your particular taste, but it gives you a place to start should you decide to make your own custom rubs, and helps prevent you from totally ruining a piece of meat while experimenting. Below is an example of a basic all purpose rub using the ratio above.
3 Tablespoons of Salt
2 Tablespoons of Black Pepper
1 Tablespoon of Garlic Powder
1 Tablespoon of Paprika
1 Tablespoon of Ground Red Pepper
1 Tablespoon of Brown Sugar
This is a good all purpose recipe, but if I were using this on pork ribs or pork butt for example, I might use the basic amounts but triple the brown sugar since I like my pork sweet. If doing a brisket, I would drop the brown sugar completely since I prefer a bolder taste for brisket with no sweetness.
As with all other areas of BBQ, making it your own is half the fun. Don't be afraid to experiment.
Fat Side Up Or Fat Side Down:
The most asked age old question, (No, not the chicken and the egg thing) should you smoke brisket fat side up, or fat side down? If you ask 100 pitmasters, you will probably get 50 for up and 50 for down. I had tried both ways many times, read countless opinions, and still had no clear answer. To be honest, I couldn't tell any difference in my cooks.
The "Up Crowd" says cooking the brisket fat side up allows the fat to render and continuously baste the meat below through out the long, slow cook. Adding flavor and keeping it moist.
The "Down Crowd" says cooking fat side down protects the meat from the heat below and prevents it from drying out.
Both seem to be plausible answers, so which is the correct method?
I decided to ask the most highly rated brisket cook in America, Aaron Franklin, and he said "Definitely Fat Side Up". Good enough for me. If Aaron says fat side up then I say that's the best way to do it. You can make your own choice.
Wrap
Or Don't Wrap:
Home - Recipes - Butcher
Charts -The
Wood - Que
Tips - BBQ
Lingo
Smokers - Que
Gear - Pitmasters - BBQ Nation - Leftovers - About
Us
Number One Tip:
Cook by temperature, not by time. It's perfectly fine to time your cook so you have an approximate time everything will be ready or how long your cook might take, but your meat is done when the internal temperature says it's done and not one minute before. Get yourself an instant read thermometer and use it.
The 3 Essentials To Great BBQ
Controlled Time, Controlled Temperature and Controlled Smoke. Everything else is a matter of personal taste.
White Smoke Good - Black Smoke Bad
Clean streams of whitish smoke can layer your food with the intoxicating scents of smoldering wood. But if your fire lacks enough ventilation, or your food is directly over the fire and the juices are burning, blackish smoke can taint your food or lead to unpleasant surprises when you lift the lid.
Start Early
If you are familiar with a particular cut of meat, you may have a good idea of how long it will take to cook, and recipes will often give you a general time table of how long the cook might be. Fact is, when smoking meat, any meat, it is done when it gets done. That's why it is so important to cook by internal temperature and not time. Every piece of meat is different. If you were to take two briskets of exactly the same size, the difference in done times can easily be an hour or more. This difference can be due to the variance in fat content (marbling), moisture content, type of beef, weather, humidity, wrapping time, spritzing time, smoker temperature, recovery time, rest time and the list can go on and on. So start early, relax, listen to the birds sing, pop a top and enjoy the pleasures of cooking outdoors.
Frozen Meat
Never put frozen meat in a smoker. It is a cooker, not a defroster. This can create many problems and could lead to some serious food safety issues.
Completely thaw meat or poultry before smoking. Smoking uses low temperatures to cook food, the meat will take too long to thaw in the smoker, allowing it to linger in the "Danger Zone" (temperatures between 40 and 140 °F) where harmful bacteria can multiply. Defrosted meat also cooks more evenly.
Don't be a Peeking Tom:
Every time you open your pit you loose valuable Heat and Smoke. Depending on the type of smoker and several other factors, it can take considerable time for your smoker to recover back to the desired cooking temperature. This can drastically extend your cooking time, as well as have a serious effect on the quality of the end product. One thing all pitmasters will agree on (possibly the only thing) is that the most important factor in smoking meat is maintaining a consistent temperature through out the entire cooking process. If you need to check your meats temperature or spritz your meat fine, by all means go ahead, but if you're just taking a peek every 30 minutes to see how things look, you are then considered a Peeking Tom and have broken a major pitmaster law.
Injections:
Injections are a great way to infuse flavor and moisture into your meats, especially those that are slow cooked over many hours which can benefit from the added moisture. But are they really necessary? Many of the well known pitmaster never inject their proteins. For example, two time world champion Johnny Trigg, claims "he has never and will never inject a piece of meat." He says he doesn't need to, his meats are juicy without them. Another master in the pit world is Aaron Franklin of Franklin BBQ. They slow smoke dozens of briskets every day, but they never inject their award winning beef. You will find however, that the large majority of competition Pitmasters do inject their products. Some will use upwards of 5 gallons of injection when cooking a whole hog.
Obviously injections are a matter of choice, and depends greatly on each individuals personal preference, type of meat, how it's being prepared and how it's being cooked. For the novice pit junky, injections can certainly reduce the chances of turning out a piece of bland, dried out meat, but before you jump in and start shooting everything up, let's take a look at a couple of the does and don'ts of injections.
As with everything else involved in producing great smoked meat, the key word is "Enhancement". You never want to change the natural flavor of your product, but only to highlight the taste, tenderness and moisture of it.
A good rule when making an injection is to use basically the same ingredients in it that you use in your rub for that same meat. You don't want the outside to taste bold and savory and the inside taste like a cinnamon stick. A simple solution of broth, salt, black pepper and garlic powder is generally a good base for an injection. Small amounts of other spices can then be added to meet your personal taste.
Always use a water soluble base for your injection, such a water, broth, even beer, but never use insoluble fluids like oils. You want something that will penetrate and bind with the meat fibers. We all know that oil and water don't mix, and since meat is made up mostly of water adding oil to your injection is a sure fire way to keep it from being absorb into the meat fibers.
Be very cautious about injecting delicate meats such as poultry. Some injections can drastically change the texture of the tender breast meat found in chicken and turkey. Butter for example. Whenever someone thinks of adding flavor to a nice big turkey breast, they think of butter. The problem is, butter is a fat, and although it may work great on the outside, it doesn't dissolve easily once inside the bird. When injected into poultry, it can tend to clump in an area causing the meat to have a mushy texture. No one wants to get a big bite of mushy turkey breast. You can certainly use butter in your injection but be cautious when injecting. Make sure to inject slowly and move the needle around often and evenly through the meat avoiding pockets of injection. And don't over inject, remember, you just want to enhance, not change the meats flavor.
So go ahead if you like, create your own flavorful, moisture packed injections, just keep in mind some simple rules and don't feed your guest a big helping of injection instead of tasty meat.
Injecting:
When injecting a piece of meat, always inject with the grain. Insert the injector in the same direction that the grain runs. This allows the injection to flow down the grain, similar to traveling down a tunnel. By injecting with the grain, it allows more of the injection to be absorbed over a larger area. Since the injection is able to spread easier, you are also less likely to have a pool of injection in one area.
Another tip is to use as few puncture points as possible. Everywhere there is a hole to the outside of your meat, there is an exit for your injection to leak out. Insert your needle in one spot and then, without pulling the needle completely out, move it around to different areas inside the meat within reach of the needle covering a larger area, then move to another entry spot.
Always inject the meat before applying a rub, otherwise you will wash a lot of your rub off during the injection process.
If possible, always allow at least 3 hours or more (better over night) for your meat to rest after injecting. This allows the injection time to spread and absorb more evenly through the meat.
Rubs:
Rubs can be applied two different ways. By using a premixed combination of spices or by applying each spice one at the time. It is generally accepted that you will achieve a more even distribution of the spices if all the spices are mixed together prior to application. Premixing also allows you to carefully measure each spice, which results in a more consistent mixture. The drawback to this is that mixing your spices before hand is a bit time consuming and if you premix, then you will need to have several different rubs on hand for different types of meat. The rub for pork butt is usually far from the rub you would use on a brisket. Applying the rub premixed might lend to a more even coat, but you have much more flexibility in the application by applying each spice separately. You can adjust each spice according to your taste without having to spend time premixing different rubs and then storing them. Many pitmasters and backyard cooks alike, enjoy making their "Signature Rubs". Some even market their rubs for sale to the public.
I prefer in most cases, to apply my rub one spice at the time since I like to keep my rubs simple, usually only consisting of 4 or 5 spices. Most rubs begin with salt and pepper and then add additional spices to enhance the particular meat being cooked. A common rule of thumb for making a basic rub is using the ratio of 3:2:1:1:. 3 parts Salt being the first ingredient then 2 parts Black Pepper being the second ingredient and then 1 part of any additional spices you choose to add.
Of course this can and should be adjusted to your particular taste, but it gives you a place to start should you decide to make your own custom rubs, and helps prevent you from totally ruining a piece of meat while experimenting. Below is an example of a basic all purpose rub using the ratio above.
3 Tablespoons of Salt
2 Tablespoons of Black Pepper
1 Tablespoon of Garlic Powder
1 Tablespoon of Paprika
1 Tablespoon of Ground Red Pepper
1 Tablespoon of Brown Sugar
This is a good all purpose recipe, but if I were using this on pork ribs or pork butt for example, I might use the basic amounts but triple the brown sugar since I like my pork sweet. If doing a brisket, I would drop the brown sugar completely since I prefer a bolder taste for brisket with no sweetness.
As with all other areas of BBQ, making it your own is half the fun. Don't be afraid to experiment.
Fat Side Up Or Fat Side Down:
The most asked age old question, (No, not the chicken and the egg thing) should you smoke brisket fat side up, or fat side down? If you ask 100 pitmasters, you will probably get 50 for up and 50 for down. I had tried both ways many times, read countless opinions, and still had no clear answer. To be honest, I couldn't tell any difference in my cooks.
The "Up Crowd" says cooking the brisket fat side up allows the fat to render and continuously baste the meat below through out the long, slow cook. Adding flavor and keeping it moist.
The "Down Crowd" says cooking fat side down protects the meat from the heat below and prevents it from drying out.
Both seem to be plausible answers, so which is the correct method?
I decided to ask the most highly rated brisket cook in America, Aaron Franklin, and he said "Definitely Fat Side Up". Good enough for me. If Aaron says fat side up then I say that's the best way to do it. You can make your own choice.
So, should you wrap your ribs? Or how about your butt or brisket? The answer is yes. Some people claim that wrapping your meat prevents it from achieving it's peak smoke flavor and texture. To this I say poppycock. Let's break it down. At around 160 to 170 degrees, the internal temperature of meat reaches a critical stage in it's cooking process. Many changes begin to take place. First the meat begins to sweat, or push moisture from the inside out. This is important to understand, because just like you sweating, this moisture escaping cools the outside of the meat so the meat temperature stops rising or "Stalls". At the same time, this moisture being forced out and lost, causes the meat to start drying out inside. Also, because moisture is being forced out under pressure it stops smoke from being able to enter and penetrate the meat any further, so the only thing still collecting smoke is the outside crust which can cause it to become over smoked and bitter tasting. In addition, the excess smoke will turn the meat very dark making it appear to be burnt or very over cooked. As if this isn't enough, sugar starts to melt around this stage which causes it to looses much of it's adherence to the meat. That nice sugary bark you put on your pork butt ends up melting, being washed away by the escaping steam and laying in the bottom of your pit. Wrapping with foil (known as the Texas Crutch) allows pressure from steam to build up inside the wrap thereby stopping the sweating action, which stops the meat from drying out, which in turn stops the outside of the meat from cooling off, stopping the "Stall" and allowing the meat to continue to rise in temperature. It of course at the same time stops smoke from getting to the meat which prevents over smoking the crust and turning your meat black. And since the foil stops the sweating, your sugary crust is not washed into the pit.
All in all, there are very valid reasons to wrap, but it's not a perfect world. Some say wrapping prevents the bark on their meat from becoming firm and crusty the way a good bark should be but instead keeps it soft and moist since moisture inside the wrap keeps the crust from drying out and firming up. This is true, so what's the answer. In most cases, using foil is the easiest and cleanest method of wrapping, however, Aaron Franklin discovered that by using Butcher Paper instead of Foil on his briskets, it created enough pressure to stop the stall and keep the meat moist, but at the same time allowed enough air to pass through the porous paper that it didn't contain all the moisture inside, making the bark mushy. It certainly proved successful for him but I've found that the majority of pitmasters, still just use foil for the job, however, lately there has been a big jump in the number of competition cooks switching to butcher paper. Personally I wrap "almost" everything I smoke at some point during the cook.
Another option is to foil wrap your meat, but then remove it from the foil and place it back in the smoker unwrapped for the last 30 minutes to an hour of cook time to set the outside bark and/or sauce. I have used this method many times and it actually works quite well, especially for ribs.
You can decide what method works best for you.
Soak
Or Don't Soak:
If you use wood chunks or wood chips in your smoker, then no doubt you have been confronted with the perplexing decision of whether to soak your wood or not soak your wood. Here's the truth about both.
Most manufacturers of propane and electric smokers will say to soak your chips from 30 minutes to one hour prior to using them. But does it help or hurt. A study performed by a culinary institute, took 2 cups of wood chips and weighed them. They soaked the chips in distilled water overnight and then weighed them again. The difference in weight was less than 1/2 percent, showing that the chips had only become wet on the very outer edge and practically no water had been absorbed inside. Maybe that's why they build boats out of wood.
The next test I would like to mention is one where wet chips and dry chips were each placed in a small pan over electric burners. They were both set to the same temperature and then timed at different phases of the experiment to see when each began to smolder, emit smoke and when they ceased smoking. The dry chips began to smoke almost immediately. The wet chips did nothing until they dried out for approximately 2 minutes and then began to smoke. From the time each sample began to smoke until they stopped smoking, was almost the exact same amount of time. This shows that soaking the chips only prolongs the length of time it takes for them to start adding smoke to your meat, they do not burn slower or add more smoke to your meat. Soaking the chips only delayed the smoking process, it did not prolong it. Bottom line is, there is no valid reason to soak your chunks or chips unless you just want to delay when the smoking begins by a couple of minutes, which would make little sense. I should mention however, I did come across one meticulous person who claims he uses half wet chips and half dry chips in his smoker. By doing this he claims the dry chips burn first and then the wet chips begin as they dry out, extending his smoking time. My only question here is, although this process might possibly cause smoke to be produced for a slightly longer period of time, would it not be easier to just add more chips when the first ones burn out?
Don't over think it. It's BBQ. Rub it, Smoke it, Eat it.
Anyway, my conclusion on this is that there is no valid or purposeful reason to waste your time soaking chips or chunks. Put your meat in, put some wood in and get on with cooking.
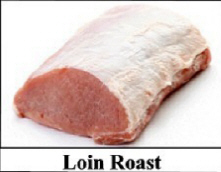
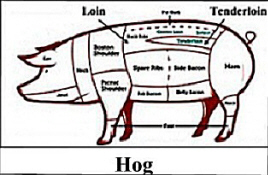
Pork
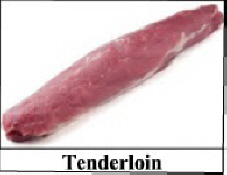
Loin Or Pork Tenderloin:
Have you ever been confused about the difference between the two? The names sure are similar. Are they the same? Are they interchangeable? No, they are not. Although they come from the same area of the hog, they are two entirely different cuts of meat.
The loin is an area that runs down both sides of a hog just below the backbone. From this loin area you can get several different cuts of meat, a loin roast, center loin, chops, sirloin, loin back or baby back ribs, country style ribs and a couple of others. A loin with the rib bones left attached is called a rib roast. If you tie the two ends of a rib roast together to form a circle, it is known as a crown roast. The average weight for a boneless pork loin is about three to four pounds and generally comes with a layer of fat on top (fat cap). When trimming, you should leave about a 1/4 inch thick layer of the fat cap in place.
The tenderloin is a much smaller strip of muscle that runs down both sides right next to the spine. This muscle does very little work so it is extremely tender. Some claim it is the most tender cut of meat on a hog. The weight of the whole tenderloin cut will be between 3/4 to 1 1/2 pounds.
The tenderloin is smaller and more tender than the loin roast so the cost is bit a higher.
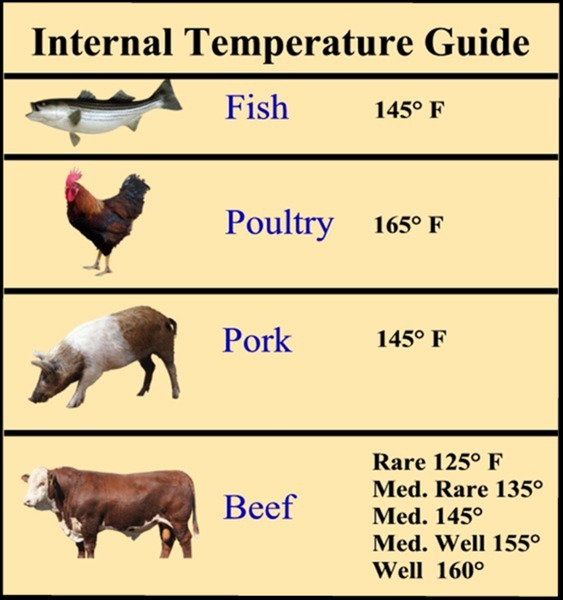
New Minimum Internal Done Temperature Guidelines
The USDA made some important changes in their recommended cooking temperatures for meats. They lowered the recommended safe cooking temperature for whole cuts of pork from 160 ºF to 145 ºF with the addition of a three-minute rest time. The new recommended temperature is a significant 15 degrees less than what was previously recommended.
The revised recommendation applies to pork whole-muscle cuts, such as loin, chops and roasts. Ground pork, like all ground meat, should be cooked to 160 degrees Fahrenheit.
For beef, veal, and lamb cuts, the safe temperature remains unchanged at 145 ºF, but the department has added a three-minute rest time as part of its cooking recommendations for those as well..
Poultry: The safe cooking temperature for all poultry products, including ground chicken and turkey, stays the same at 165 ºF.
Types Of
Beef Ribs
There are essentially three types of beef ribs.

The New Guidelines Are Reflected In The Chart Below